
Arraymusic is a non-profit creative arts space in Toronto’s West Queen West neighbourhood. We are an incubator of big ideas, offering scalable rates to grow your project from concept to full production.
To Book the Studio:
- Select “Book The Array Space” category below
- Choose a time block (minimum 3 hours, up to 14 hours)
- Pick your day and continue to checkout
- Pay a 25% deposit to confirm your booking
- Full payment is required one week prior to the session date (Interim partial payments are welcome — pay in instalments up to one week prior to your booking.)
- Important: After paying your deposit, you will receive a confirmation email. You can make changes to your booking via the info inside your confirmation email.
To Book a Free 30 Minute Walk-through or Consultation: Select the “Book a Consultation” category below
For Studio Availability: See the Availability Snapshot.
For Rates: Select the “Book the Array Space” category below
Discount Codes: Instructions here!
For More Information: See FAQs or the Renters’ Handbook
Array Space Availability Snapshot (Use the Form Above to Book)
(click the booking to see duration, or switch from Month to the Week or Schedule view)
Frequently Asked Questions
- Hours: 9:00 AM – 11:00 PM daily
- Max. Capacity: 90
- PA system with mics, stands & cables
- Lighting grid & console
(See details in Renters’ Handbook below)
- 65 chairs (up to 80 on request)
- 14 music stands
A non-refundable 25% deposit is due at checkout. Once paid, your time is confirmed and added to our calendar. Final invoice (cleaning fee, rental items, technician fees) are due 1 week before your booking. You can pay your invoice in installments, or as a lump sum.
Access codes are provided once payment is complete. All payments are processed via credit/debit or bank transfer.
Use the links in your confirmation email to adjust rental items, technician hours, or your booking time/date. You can make changes up to 1 week before your event. If the cost changes, we’ll send you an updated version of your invoice. If you need to cancel, your payments are on file and will be applied to your next invoice.
Same hours each day Choose “Select and add another time” after choosing your first time block. 10% discount applies to all days selected.
Different hours each day Use “Schedule another appointment” Consecutive days will qualify for a 10% discount.
Note: Discounts don’t apply to gear rentals, technician hours, or piano tuning. Unbooked hours (9am–11pm) during multi-day use are available to others which may require a full strike of the floor.
Array is a DIY space. You’re in charge of setup and strike unless Array staff is booked. Our techs know the room well and offer support for:
- Audio Recording
- Front of House Sound
- Video Production
- Live Streaming
- Flat-rate Video Recording
You’ll receive unique access codes by email 2 days before your booking. Codes activate/deactivate based on your scheduled time. Please account for any setup/strike time you may need. Early arrivals or late departure are not permitted and will incur additional charges.
Each booking includes a cleaning fee which goes toward our weekly cleaning. Please return all gear and furniture to their original position, leaving the floor clear so the next client can get started quickly. A $100 reset fee will be applied if the room isn’t left in a way that is inconsiderate of others.
Yes! Just clean up and take the trash down to the entry level after your event. There are QR codes on each can to show you the way. Serving alcohol? You’ll need a Special Occasion Permit and a Smart Serve certified bartender.
Our Renters’ Handbook (below) is a great deep dive. Want to chat? Book a free 30 minute consultation above to visit the space or talk with us. We’re happy to help you match the room to your creative vision!
Renters’ Handbook
Welcome!
We deeply value the energy you bring to Arraymusic. Our space exists to support creative freedom, and with that freedom comes responsibility.
We ask all renters to respect our space and our neighbours. Please note the following expectations during your booking:
- You are responsible for your guests at all times. All guests must remain within the designated rental area. Do not enter other rooms, hallways, or units within the building.
- Be considerate of our neighbourhood. Please respect the residents and ensure they are not disturbed in any way. Congregating off Array property will result in additional fees. This is a zero tolerance policy.
- Leave the space in the same condition you found it. Dispose of garbage properly, return any moved furniture or equipment, and report any issues immediately.
- You are liable for any damage, disruption, or extra cleaning caused by you or your guests. Please plan your event with this in mind.
Let’s work together as a community to ensure Arraymusic remains a space where creativity thrives.
Parking
- Note the signs for paid vs free street parking on Adelaide, Walnut & Queen St.
- Spaces directly in front of the building can be used for loading/unloading only (5 minute max).
- Do not leave your car in the building’s parking lot.
- There is a large Green P lot at the intersection of Walnut & Richmond.
- Street parking around the neighborhood is available until midnight.
Entering & Exiting the Space
- You will receive 3 CODES and detailed instructions via email – keep them on hand as you enter and exit. Array staff are notified when you enter and exit the building.
- There are often sessions before and after yours. Early arrival or late departure will result in additional fees.
Elevator
- Open the lock box on the main floor elevator door handle with code: 2580 Insert the key into the elevator and turn it clockwise until flat (3 o’clock).
Note: If accessing the lift from the main studio floor, the key is already inserted. Please do not remove this key. - Push and hold the button down until the elevator reaches the floor and unlocks.
- To go to another floor, enter the elevator, shut the door (leaving the key in), and push and hold the button for the desired floor.
- Return the key to the lockbox when done.
NOTE: If closed, the door will automatically lock after one minute.
Layout
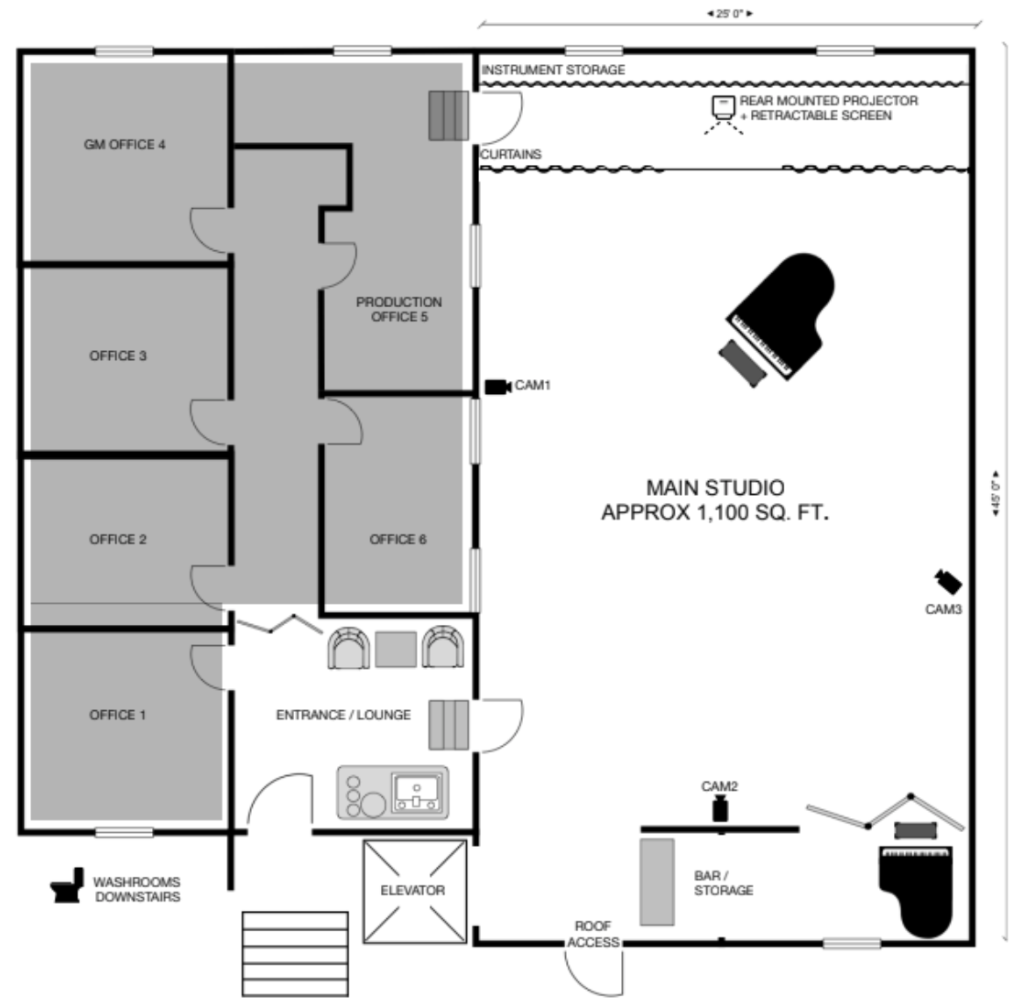
Audio & P.A. System
Console: Presonus StudioLive 24 Series III (Manual HERE)
Backline: Mic stands & instruments behind the black curtain.
Mics, DIs, cables, adapters: In the black AV cabinet next to the console.
Power Up
- Flip power switch (lower right rear of console).
- Power on both main speakers (switches on back).
Adding Sources
Use the stageboxes beside the right speaker & behind curtain. Each input maps to the same channel on the console (e.g. input 1 = channel 1).
- Press Select on the desired channel.
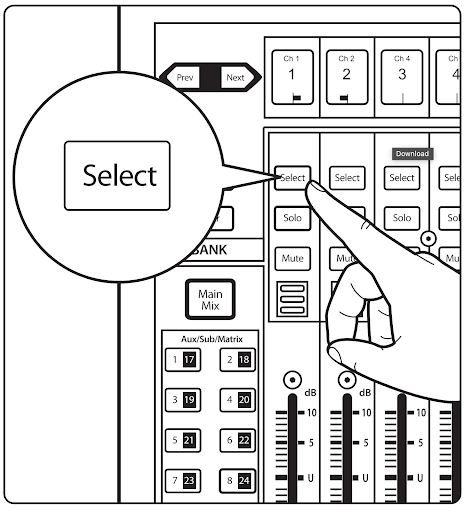
2. Press the Input button in the center section.
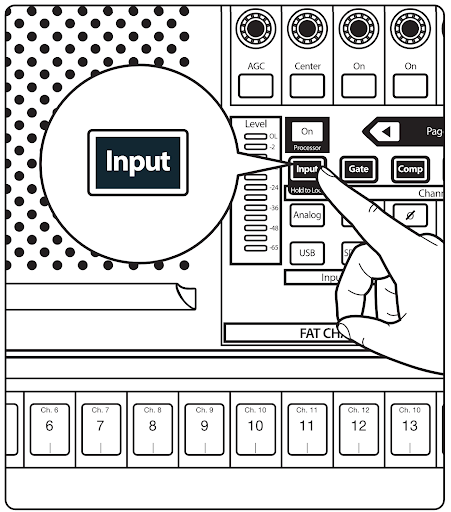
3. Adjust Gain until the meter hits green/yellow (avoid red). ~35–40 dB is good for vocals (SM58).
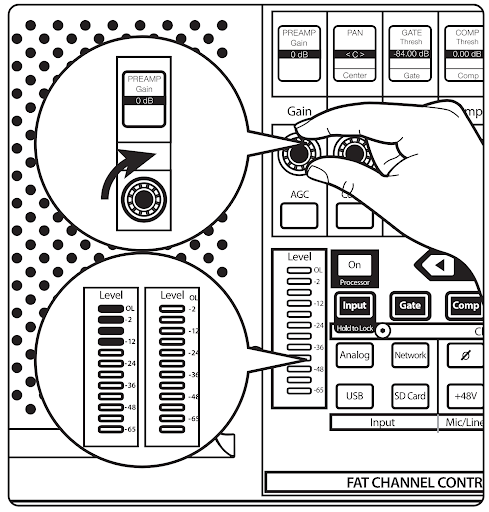
4. Raise the channel fader.
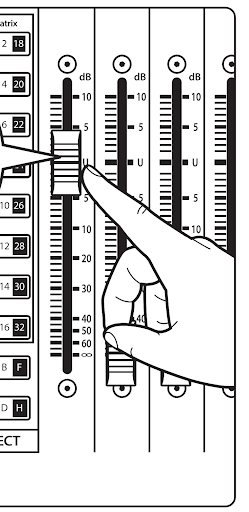
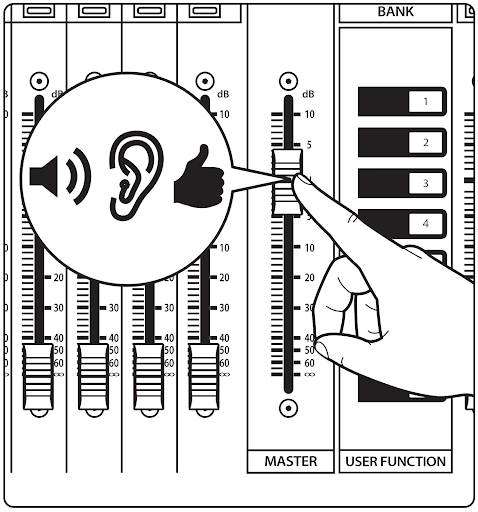
5. Raise the main fader to set overall volume.
Using the Monitors
Monitors are on the rear shelves beside the console. Power cables & adapters are in a small white box labeled “Monitors”.
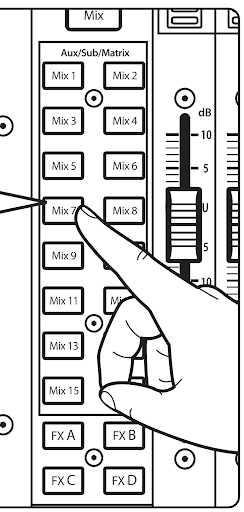
- Connect ¼″ TRS or ¼″→XLR from Aux 13–16 (snake behind curtain) to the monitor speaker.
- Plug into input 1 or 2 in the back of the monitor.
- Turn the monitor on & adjust trim knob for volume.
- On the console, press Mix 13-16 (Choose the Aux your monitor is plugged into), then use the faders to send signal.
Powering Down
- Power off all monitors.
- Turn off
+48vphantom power (if used). - (Optional) Recall Project/Scene “Zero” to reset console.
- Return all cables, mics, and gear to original storage.
- Turn off the console.
Lighting
Lounge Area, Hallway, and Stairs
- Light switches are located beside the alarm system panel.
Main Space
- Console: Elation Scene Setter 24 ch DMX controller (Manual HERE)
- All lights in the main studio are controlled by the lighting console. The lighting console is located in the back corner of the space beside the audio console. There will be small desk lamps illuminating this area. Please leave these lamps on when you leave.
Operating Lights in the Main Space
- Push the button in the bottom right corner of the lighting console marked On/Off. The yellow light beside the On/Off button is flashing if the lighting console is OFF
- Faders A and B must both be set to 10. 10 for Fader A is at the top and 10 for Fader B is at the bottom.
- The top row of faders are for individual lights. The bottom row of faders are lighting presets.
If the Main Space Lights Don’t Turn On
- Check that A and B master faders are both set to 10 (Please Note: that 10 for Fader A is at the top and 10 for Fader B is at the bottom).
- Check that faders are up along the top and/or bottom row
- If still no lights, check if the unit is plugged in and check the power switch on the back of the unit.
Projector
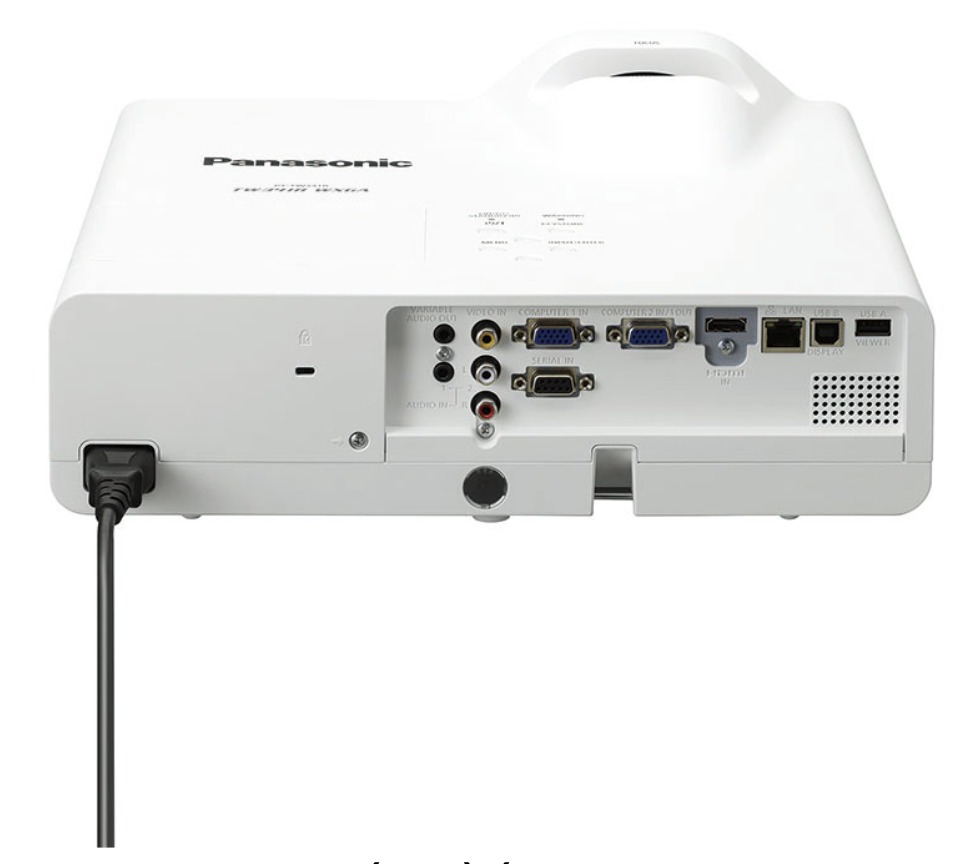
Panasonic PT – TW341R (XGA) (find the manual online HERE)
- Remote control is located on the shelf beside the curtain fly. Occasionally it is on the 2nd shelf beside the audio console. There is bright tape on the back with the word “Projector”
- HDMI connection is labeled and hanging on the wall under the projector
- Raise and Lower the motorized screen with the toggle switch, located on the brick wall beside the curtain fly
Important: Please Note
- Stop the screen motor before it reaches the top. It should overhang slightly.
- The toggle switch has 3 positions. The middle position is stop. You MUST stop the motor when you raise and lower the screen to your desired position.
To Turn the Projector On
- Push the red button on the remote once, while aimed at the projector (light on the bottom of the projector will turn *GREEN*). You must have a source connected or it will power down in 5 minutes.
To Turn the Projector Off
- Push the red button on the remote twice, while aimed at the projector (light on the bottom of the projector will blink and then change to RED when cooled).
Instruments
Pianos ($50/day)
- Baldwin 9’ Grand (1)
- Yamaha Baby Grand 6’ (1)
Percussion ($20/day)
- Mapex Pro M full kit + cymbals & hardware (1)
- Add’l options for snare, kick, floor & rack toms
- Perc battery by request includes: Timpani, mallet instruments, gongs, misc hand drums etc
Audio Backline
Amps
- Roland Cube XL15 Guitar Amp (1)
- Ampeg BA-108 Bass Amp (1)
Microphones
- Apex 125 (1)
- Apex 381 (2)
- Apex 565 (1)
- Aston Spirit (1)
- Audio Technica KP – Kick/Tom (2)
- Audio Technica KP – Snare/Tom (2)
- DI (4)
- Rode M5 (1)
- Fender P51 (1)
- Shure SM 58 (3)
- Shure SM 57 (1)
Console
- Presonus StudioLive 24 Series III (Manual HERE)
Speakers
- Mains – Yorkville Elite EF12P (x2)
Mic Stands
- Tall (9)
- Mid (1)
- Short (2)
Cables
- XLR (20)
- 1/4″ TS (8)
Accessories
- Manhasset music stands (14)
- Keyboard stands (2)
Lighting
Console
- Elation Scene Setter 24 ch DMX controller (Manual HERE)
White Spotlights (4)
- Faders 1-4
- To reposition: climb up the ladder and gently rotate.
- Push/Pull the tabs on the sides to change the light shape.
- Loosen the knob on the shaft to focus the edges of the light.
Room Lights (Track Lighting)
- Faders 5 – 8
- 4 rows/zones for general overhead track lighting.
Coloured Spotlights (3)
- Faders 9 – 16
- Each light has 4 faders assigned; Red, Green, Blue and Amber
- To reposition: climb up the ladder, position, and retighten securely.
Video
ATEM Mini Pro ISO – Switcher/Recording Device (Tech Specs)
- Records 4 ISO video files at 1080p up to 60 fps
- Records broadcast feed as a 5th video file
- Embeds audio feed from the console on each video file
- Audio mix can be discreet, FOH mix, or a combination of both
- Stream to 1 platform
- Multiple platforms available upon request
- Recorded files can be dropped directly into a Davinci Resolve timeline for post-production editing. Live switching during the broadcast will show as edits and fades on the timeline, giving you a head start in post.
- Note: Writing 5 simultaneous video files if very hard drive intensive. Your drive must be capable of AT LEAST 500mb/s sustained write speeds. We highly recommend 1000mb/s drives. We use this drive.
Sony SRG-300H PTZ Cameras (3) (Tech Specs)
- Positioned throughout the room in fixed locations
- Offer full coverage of all locations in the room
- 1080p up to 60 fps
- Controlled via Sony RM-IP joystick controller
Sony RM-IP 10 Controller (Tech Specs)
- Camera control with joystick for 3 Sony PTZ cameras
- Save and recall up to 16 preset positions per camera